Thursday, August 30, 2012

It's Done!!!

Can I dance for joy? My dining room table is done, all done! And it looks amazing, if I can brag just a little bit. 

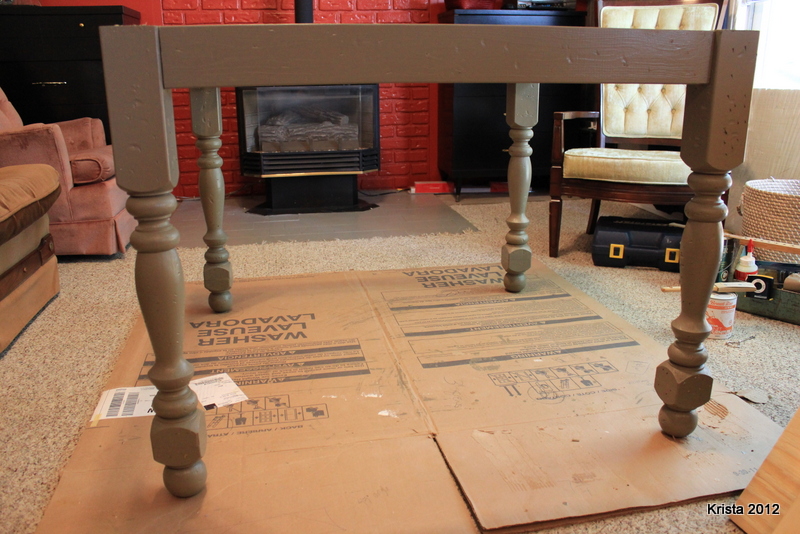
Progress from last post. 
Spent one day staining my boards - decided to go with a walnut colour from SamaN (Home Hardware product).  For never having stained anything before (at least not wood stain - I've done the food stains before! LOL) it was a pretty easy product to use.  It's a semi-transparent stain, so the natural grain of the wood showed, and even better, all the little dings and nicks took on a deep colour. Sure added to the rustic look of the table. 

 Top picture is with one coat, second picture is with two coats. I'm loving how rich and deep the colour went. It's exactly what I was dreaming of in my head. 
This stain dried incredibly fast, and by supper time, the boards were back inside and ready for the next step. 
Of course, now I was panicky. See, our old table was still in the dining room. I had listed it on our local classifieds site, but hadn't had anyone really interested in it. We had one spammer, and one person who didn't want it because the top was laminated, so it wasn't "real" solid wood. Not sure what it was she was looking for, but the laminate was real wood and the table was solid wood. Then the day the stain was done, we had someone call, and they came to look at it, and they took it home with them! So now my dining room was empty and ready for the new table. 

Our last meal at the old table. That table has seen 17 birthday parties in our family (10 for C1, 7 for C2), it's seen laughter and tears (I believe I was at that table when we called my parents to say that we were expecting, and when I called to say we had lost a pregnancy), it saw first meals as a couple, biscuits that were hockey pucks, and rice where I doubled the rice, but not the water (I was still learning to cook and bake at that point). It's seen fancy china and disposable dishes. It's seen really good meals, and meals my kids threw back up on the table.... (ick!)  It's had many card and board games played on it, it's served as my craft table, my sewing table and a storage space.  There's so many memories made with that table, it was bittersweet to see it go, but I know that the memories won't leave with the table. They are here to stay. And new memories will be made with the new table. Hopefully, for at least a few generations. 
Second picture shows how we ate a few of our meals.  Table just wasn't quite ready to move into the dining room yet.  I moved my bench to this wall for something different. I kind of like it. (It usually sits under the chalkboard). 
ouch... that's all I can say.  Remember from last post all those holes I predrilled? Well, I was having some problems with my screwdriver bit staying in the drill.  See, I had to add an extender on to the bit because it was too short for the depth of the holes and the bit kept falling out and staying in the holes. I was trying to screw the boards to the top of the frame, so I figured if it was falling out with the table on it's top, maybe if I flipped it around so it was standing on it's legs, the bit would stay in the drill. Well, that didn't help at all - actually got the bit stuck in one of the holes so tightly that it took the Hubs a lot of wiggling and banging at it to get it out. But by that time, I had the table together. I put those screws in by hand (about 45 of them!). One big blister popped. There was one more that a few more screws would have made it pop. My thumb and fingers were that really sore feeling you get just before blisters form, and my thumb on my left hand is still sort of tender. 

It's finally in it's new home! I added some nails to the top for a little more rustic detail, and a bit of extra oomph - have one board that's a little warped, nails seemed to help hold it in place a bit better. 
I'm so glad that it fits the space, and it suits the space so well too. Can hardly wait for company to come over so I can show it off. 

A little tablescape. A little bird I found at the thrift shop, a glass dome - I think it's from a clock, but it works this way. And my favorite scent at the moment - Cranberry Chutney (I will be heading back to the store to get more).
Two chairs fit perfectly on a side, so it will seat 6 on chairs, and at least 4 kids on the bench. There's also enough room on the sides that if we have to squish 3 chairs to a side, we can. Now I  just need more chairs! With selling the other set, our spare chairs left too!  Those chairs will get a makeover yet too. 

Well, table is ready for company. Coffee can be made quickly - anyone coming?


Monday, August 27, 2012

Dining Room Table - Part 3

I was going to wait and post a final post once it was all done, but I see that's it's been a while since I've updated, so I guess I should get another post up. 

Ok - last I was on, I left the project at the painting being done. So, lets start with what I did next. 
Next up, I added a plywood top. 
I used "L" shaped brackets (3 a side) to attach the plywood to the frame.  (forgot a photo of that). Anyways, this doesn't look too bad, so let's flip the table and see what it looks like.
Well, the wood on top looks good. Till I took a closer look. Hmm, I hate the way I can see the plywood. Not the look I was looking for. Plus, it added an extra 3/4" to the height. Not good! Especially since the table legs are 31" instead of your standard 28" (All 4 of us have long legs, Hubby and I are tall, the boys are getting there). So you add the 3/4" plywood, plus the 3/4" table boards to the 31" legs and you have 32 3/4" height table - we would have needed new chairs!  So less than 24 hours after I put the plywood on, I took it off. Will save it for a different project.

So, back to the hardware store I go. Where I meet a friend who asked if I lived there. To which I responded.... yes!  I explained my problem, and the guys behind customer service desk were very helpful in knowing exactly what I needed - joist brackets.  So, a 2x4 and some brackets, and we have a much better top. Hubs figures it looks like a little deck. 
Kids thought it was a deck! Told them this was the first and last time they were allowed to stand on the dining room table.  There is a certain amount of pride in knowing that I built it strong enough, that we could stand on it and it wouldn't break. I think I did pretty good. 
Next step.... washing the boards - there's 100+ years of dirt on them. 

The first picture shows how dirty the boards were. I thought that nice deep brown was actual colouring - but it all washed off.  Second picture shows my tools. I scraped and vacuumed, and scrubbed with a wire brush and vacuumed, and then I scrubbed with a wet floor brush. The towel is covering my legs because I didn't want them getting gross. 
Here's how the boards look after one washing. They sure lost that rich colour. Oh well, now I get to learn how to stain something. 
Cut my boards to the size I need. Sure is starting to come together. 

Predrilling all my holes. My brother-in-law gave me the idea of screwing the boards to the frame from underneath. So - lots of holes later - I think I have enough. I put my boards onto the floor and then the frame on top so that I could see where I  needed to put the holes. I didn't do the holes all the way through. Only about 2 1/2" deep, my screws are 1 1/2" long, so that leaves me 1" of 2x4 and a 1/2" of table board to screw through. I think it will work. Sure is coming together. 

Tonight, I will wash them one more time, and then give them a good sanding. Tomorrow, I get to play with stain.

Wednesday, August 22, 2012

Dining Room Table - Part 2

Today I was able to work on the table some more.  My Father-in-law stopped by the other day to pick up my oldest for a motorcycle ride, and I was so glad he did, because I needed help.  In a big way... I had started to predrill the holes for my dowels, and of the 9 I predrilled, I messed up 5. Not a good ratio. So my Father-in-law very willingly helped. 
 
So let's play catch up from the last entry. Table legs and framework had been painted. 
Here I am getting the framework lined up between the legs, and measuring where the holes would go. 
Yeah, I didn't take any pictures of the messed up holes... or my Father-in-law helping. By the time I thought of taking some, he had left for home.  Got the dowels in, and glued. Used a tarp strap to hold it in place while the glue dried. 

Added my braces, 3 of the 4 were nice. The 4th, I messed up. It got cut a little smaller than the rest, so I tried to cut a little groove into it with my miter saw, so it would fit around the corner of the leg... well, it shifted and got snagged, and I'm really hoping that I didn't wreck my saw. Will have to get my Father-in-law over again to see.
It's up! And level! And solid! No wobbles. :) Was a little concerned, I'd flipped it over and have one leg inches shorter than the others. 
I've been wanting to use this on a project for a long time. I purchased it years ago for a craft and it's just been sitting and waiting ever since. 


Well, here it is. I'm still a little hesitant over the colour. I'm hoping that with the colour of the wood for the top, the cream will mellow a bit. It's feeling sort of yellow at the moment. 
Hopefully, it will be better in the brighter sun of daytime, then in the dark living room.
Tomorrow, I will be starting with the wooden top. Plus some house cleaning, and bread making....


Tuesday, August 21, 2012

Garden Shed Makeover


Two years ago we pulled out our old wooden fence. It was rotten and falling apart. But I kept every single piece of it. I wouldn't let the Hubby throw it out, and I wouldn't let him burn it. I knew I needed it for something. Well, this summer, I finally figured out what to use it for.  
See, we have this oh so wonderfully ugly garden shed in our backyard. Structurally, it's in great shape, but cosmetically, it's rather ugly.  It doesn't help that the shed beside it looks like a calf shelter from someone's pasture. It's actually been called the outhouse shed, it's about the same size as a two-holer outhouse. :)


 See? Told you, rather ugly. The whole thing is just bland, beige and boring. I added the gravel and brick walkway last fall, and while it helps with the look - it just wasn't enough. 
For a long time I had this vision in my head of what I wanted it to look like, and it was only made stronger when I saw a garden shed makeover from Donna at FJI

Funky Junk Interiors

Here's what her shed looks like: 


  So, I gathered my supplies, and some unwilling helpers (my boys!) and off to work we went. Of course, I couldn't save the project for fall when the weather is cooler. Nope, I had to do it in the hottest week of the summer. +35C and hotter (that's 95F for my American Friends) and no cloud cover. Thank goodness the shed is in shade most of the day, otherwise I think I'd have ended up with a nasty sunburn and heat exhaustion. 


Above photos are the boys pounding nails out from the inside. They didn't mind helping - for all of 5 minutes and then they went to find something else to do. 


I started by ripping of all the siding from the front of the shed.  I also opened a hole up in the wall. I had an old window my brother-in-law had given me, and I was going to use it inside the house as a decorative piece - but it was telling me, it needed to be used here. So I listened. :) The bar across the window opening is the shelf inside the shed - most useless shelf ever - 6' high and 2' deep. I needed a ladder to see what was up there, and couldn't get anything up there unless I tossed it or found the ladder! So - it came out as well. 


You can see on the bottom that I've started putting on my new siding - which if you had been paying attention to the beginning of this post - yep - that's right - it's my old fence boards.  See - told you I found a new home for them. 


I went horizontal with the fence boards, until I reached the top of the door, and then for a little extra detail, I put the boards vertical. I didn't angle the tops of the boards, just kept them as a straight cut - Added a little extra pizazz, and was so much easier than trying to figure out angles on a shed that isn't perfectly straight or square. 


Front is all done - what a difference it made. I still plan on painting the window trim and the door grey - it will blend into the old wood much better than the glaring white it is now.  Took me all day to do the front of the shed. Took the next day off, and then the day after, I tackled the side that I can see from the house. 


Stripped the old siding off, and started placing the new siding. Again the boys provided much help. (haha - NOT!) 
Although, they did help me decide if the new siding should go horizontal or vertical. 


We went vertical. I love how it's starting to look like a prop from on old western movie. You can see that I've started adding decorations to the shed - the trellis is actually an old wooden baby gate. (I believe it was the one my parents used for me and my siblings). Next spring, I will put a planter at the base with a climbing plant in it.  You can also see the disaster zone, that actually spread quite far out, because I decided to clean out the other shed while I was working. Thank goodness I have access to a truck.  Again - this took me all day, and the next was spent resting. It was so hot that week, I'm surprised I didn't make myself sick. Plus with all the hammering - my wrist that has carpel tunnel was not happy. A day of rest was much needed. Day 3 of the project, I started on the other side. Ripped the siding off, and ripped out a big chunk of the plywood wall.  I had two more windows from the other brother-in-law that I was going to add here. It was easier taking out the whole piece of plywood, then trying to cut out what I needed.


These two windows were a little trickier going in - I had nothing to work with, just a big hole. They were also hinged, so I wanted to have them opening. I had to get creative and make a window sill, and then figure out how I would get it in, and in to stay. Plus I had to figure out how I would get the windows in - they were just a smidgen bigger than the opening.


I made them work by putting their existing hinges on the outside of the shed, and not onto the 2x4 framing. It worked. They're still there! The sill is an old piece of 2x6 that made up the original step to the shed. There's still more left - thinking of making benches for by the fire-pit. Also patched up the rest of the opening.


This is my inside view - I love that the windows open, and with the door open, I will get a breeze though the shed if I'm in there working.  I plan on adding a potting bench, and some storage for all my garden tools. The hubby and the boys have been told that this is no longer a junk storage for all their stuff - it's now MINE! Once I'm done my dining room table, then I will get back outside to finish the inside of my new potting shed. 


See? All done. Now to add some fun and rusty finds, some old pots and to finish the inside. Well, I'm off to run some errands, and start working on my table again. Hopefully, I can get the framework done tonight.


Friday, August 17, 2012

Apple Picking

This afternoon, the boys and I headed out to a friend's parents place. Her Mom has apples trees, lots of apple trees... and of course, I didn't bring the camera... oh well. Guess if I want pictures of the apple trees, I can go back.  The trees were so full of apples that the branches were touching the ground.  We were only there about an hour. Half of that was spent at the trees, picking and talking.  We only took apples from one tree, and only as high as we could reach. I filled 5 grocery bags so full, they overflowed inside the trunk of the car.  Picked up a big bag of sugar on my way home, and it was off to work I go. 

 I dumped one bag into the sink, and washed them off. Found a few friendly little ladybugs, who were removed and placed onto my house plants.
 Then I chopped up enough to fill my pot and placed on stove.
  They were hardly simmering when the boys came down to inhale the wonderful scent of hot apples.


 After they were all soft and mushy, I started the time consuming job of squishing out the good stuff. So thankful, that I have one of these cone sieves and the mallet/roller thingy.

Then I added some sugar - just enough for our own tastes (we like it a little sweeter).

Reheated it, and then bagged it.  I choose to freeze it in 2 cup measurements as that's just about right for us for one meal. And in bags frozen flat - they don't take up a whole lot of space in the freezer.

I got 16 - 2cup bags.  That's just from 2 grocery bags of apples, I still have three more to do tomorrow.  Feet and back are sore - but I know come winter, we will be glad for my hard work and the tasty applesauce.


Added on Saturday - I got a total of 44 cups of applesauce, and 50 cups of sliced for apple crisp, and 50 cups of just sliced (will deal with that in winter).